Who Don't Need It?
If Blender is your only toolchain, you don't need this add-on.
Who May Need It?
Game developers
Who need to import FBX files into Blender and export FBX files to game engines.
3d digital artists
Who need to share your 3d artworks to other 3d digital artists who use other 3d softwares, or you want to sell your 3d artworks in various digital markets.
What is it?
Blender is lack of native FBX support, when we import some older and newer FBX files, it often fails.
So I made a better FBX importer and exporter with official FBX SDK from scratch.
The add-on is compatible with all FBX versions, from ASCII to binary, from FBX 5.3 to FBX 2020.
I have tested the importer and exporter with about one hundred commercial FBX files which made by 3d digital artists in 3ds Max, Maya or Cinema 4D, the add-on can import and export these FBX files successfully.
The exported FBX and DAE files have been verified in Unity Engine 2019, Unreal Engine 4/5 and Godot Engine v3.2 with no issues.
Features
- Supports Blender v2.79 - v4.0 alpha.
- Supports exporting PBR material to Unity Engine & Unreal Engine.
- Supports importing PBR material from 3ds Max & Maya.
- Supports Blender Renderer, Cycles Renderer, and Eevee Renderer.
- Supports N-Gons (Polygons consisting of more than 4 vertices).
- Supports importing FBX, DAE, OBJ, DXF and 3DS files.
- Supports exporting FBX, DAE, OBJ and DXF files.
- Supports exporting FBX smoothing groups.
- Supports automatic bone orientation.
- Supports armature deform animation.
- Supports exporting non-linear animation.
- Supports shape key animation.
- Supports multiple material sets.
- Supports multiple UV sets.
- Supports multiple vertex color sets.
- Supports meshes attach to bones.
- Supports mesh instances.
- Supports generic node transform animation.
- Supports dummy nodes.
- Supports camera.
- Supports lights.
- Supports custom properties.
- Supports importing vertex animation of Maya format(.mc/.mcx) and 3ds Max format(.pc2).
- Supports exporting vertex animation of Maya format(.mcx) and 3ds Max format(.pc2).
- Compatible with all FBX versions.
- Supports exporting from any generic rigging system.
- Supports exporting game-friendly armature from Rigify Auto-Rigging System.
- Supports importing Blender friendly armature and 3d models.
- Supports exporting game engine friendly armature and 3d models.
- Supports importing multiple files in batch.
- Supports exporting to separate files in batch.
- Supports exporting multiple actions or multiple NLA tracks.
- Supports concatenate multiple animations into single animation.
- Supports UDIM mapping.
- Supports Unity Engine 2019, Unreal Engine 4/5 and Godot Engine v3.2.
- Supports Windows, Linux and macOS.
Limitations
- Does not support IK bones*.
- Does not support custom bone shapes.
- Does not support multiple bind poses.
*IK Support
The add-on can export and import basic IK constraints since v4.1.10.
You can only use empty object as the target object, if you did not assign a target object, the add-on will create an empty object as the target object automatically.
The add-on can import basic IK constraints from Maya correctly, but the exported IK constraints are not compatible with Maya.
To import the basic IK constraints into Maya, you need to insert at least one keyframe of any object, for Maya treats IK constraints as animation data, if there isn't any animation data, the IK constraints will be ignored.
After imported the basic IK constraints into Maya, you will find that the bones can't be driven by the effector correctly, this is caused by the wrong pole vector value. To fix the issue, you need to copy the rotation value to the 'Pre-rotation' value for every bone between the IK chains, and reset the rotation value to zero, for Maya use the 'Pre-rotation' value to calculate the pole vector value.
As 3ds Max can't export and import IK constraints at all, you can't import and export IK constraints for 3ds Max.
Interface
Importer:
To import an FBX file, navigate to File->Import->Better FBX Importer (.fbx/.dae/.obj/.dxf/.3ds).
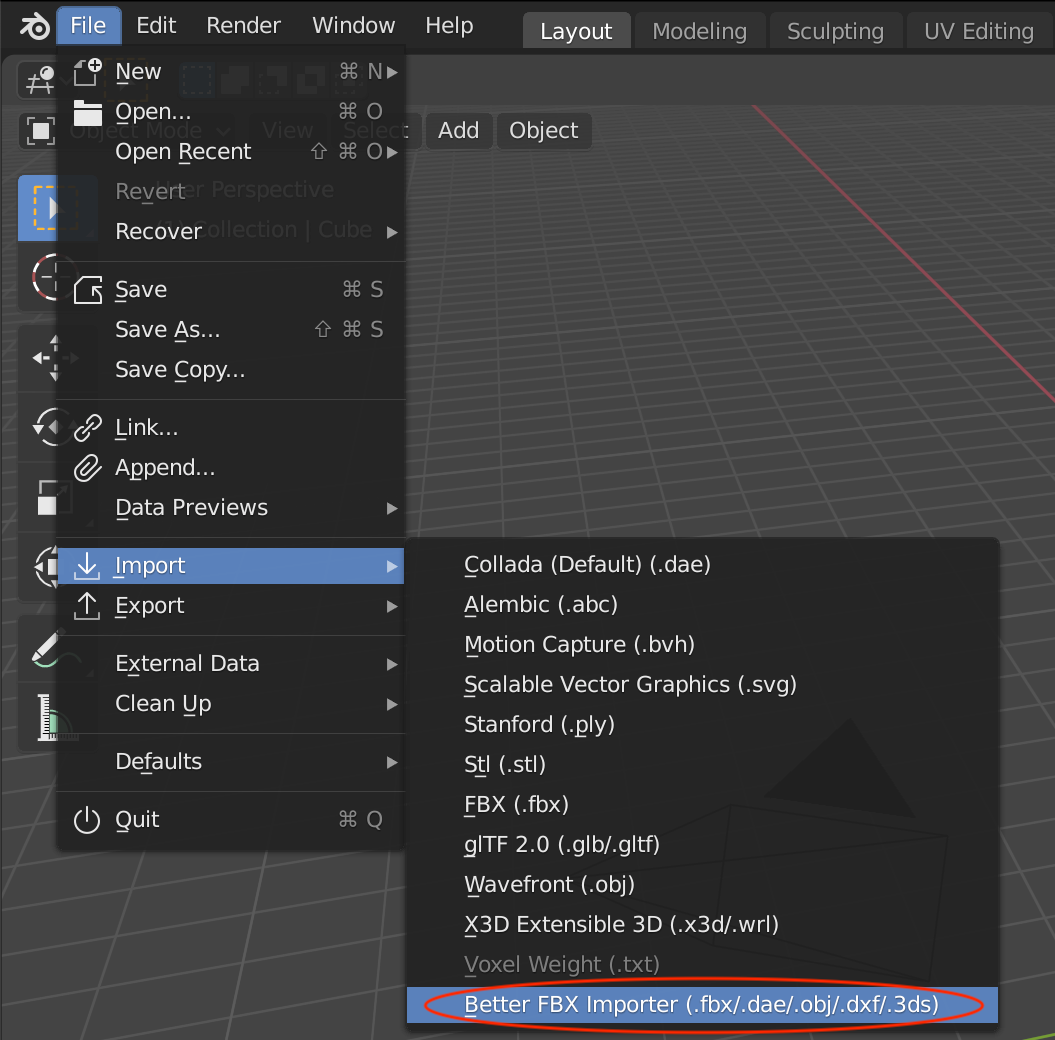
Then you can select leaf bone style, set scale value and other parameters, select the FBX file, click 'Better Import FBX' button to import the FBX file.
Exporter:
To export to an FBX file, navigate to File->Export->Better FBX Exporter (.fbx/.dae/.obj/.dxf).
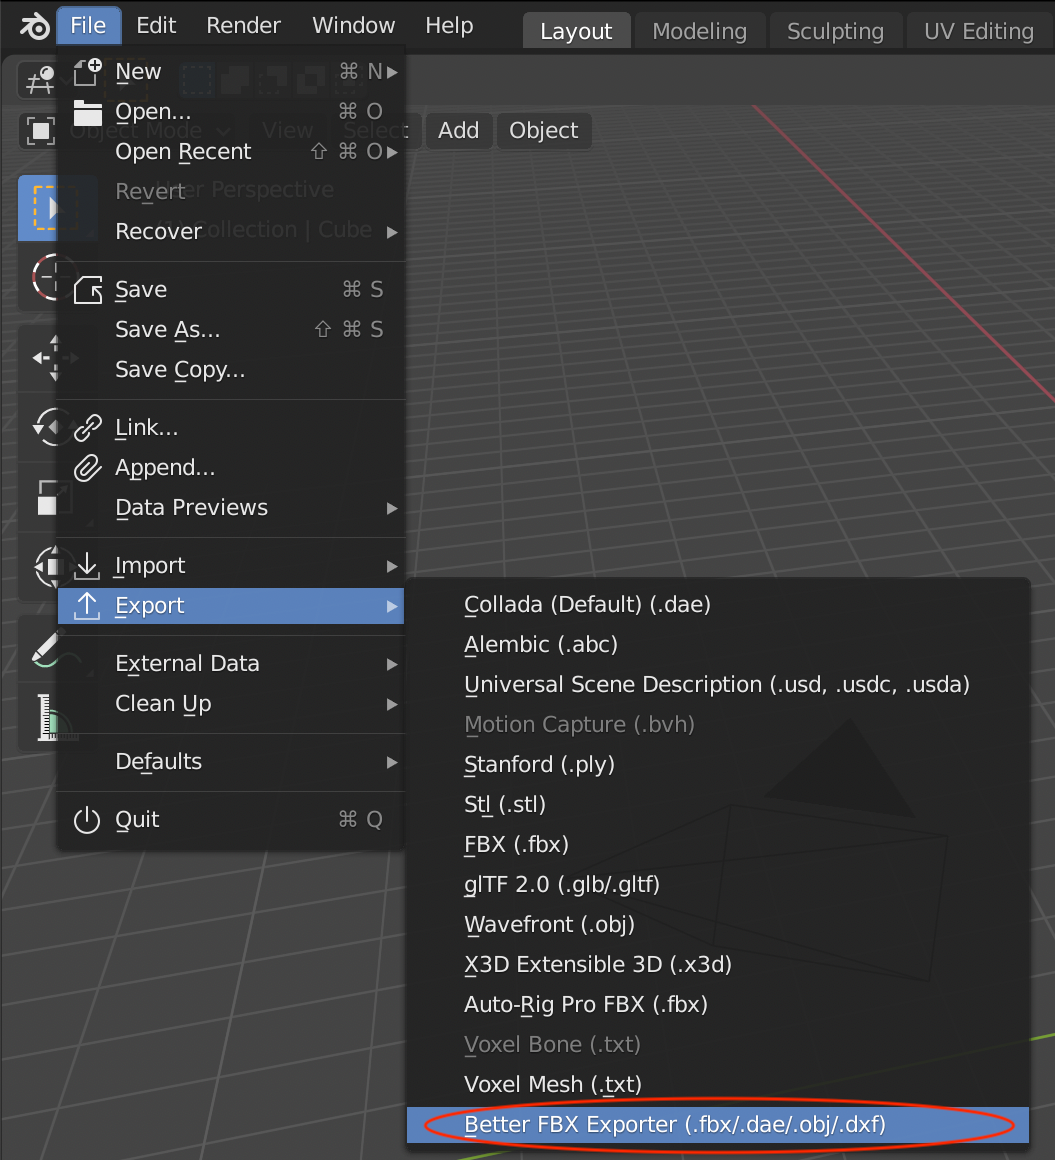
Then you can select FBX version, set scale value and other parameters, enter a filename, click 'Better Export FBX' button to export to the FBX file.
Showcase
Here is an imported robot warrior in Cycles Renderer of Blender 2.79b, you may notice that his shield and weapon have already been attached to proper bones automatically, and all bones orientations have been corrected automatically, while the armature deform animation remains not changed.
Here is an imported ancient Chinese soldier in Eevee Renderer of Blender 2.80 Release Candidate, you may notice that his spear has already been attached to the right hand bone automatically, and all bones orientations have been corrected automatically, while the armature deform animation remains not changed.
Here are three characters in the Editor of Unity 2018, note that Santa's eyes, mouth and face are driven by shape key animation, and his body is driven by armature deform animation.
Here is one character in the Editor of Unreal Engine 4 v4.22.3, the scene is the famous starter scene - 'Table, Glass And Chairs', note that Santa's eyes, mouth and face are driven by shape key animation, and his body is driven by armature deform animation.
Here is one character in the Editor of Godot Engine v3.2, the exported character and animation work properly.
Here is a simple cloth simulation in Blender 2.82, you can export the vertex animation as Maya(.mcx) format or 3ds Max(.pc2) format files; You can also import Maya(.mcx) format or 3ds Max(.pc2) format vertex animation files into Blender.
Tutorial
Video Tutorial for v5.0
Video Package: Download the HD version of the video(Format:zip,Size:35MB,Date:Mar 15,2022). new
Watch Online:
Video Tutorial for v5.0 - II
Video Package: Download the HD version of the video(Format:zip,Size:27MB,Date:Mar 21,2022). new
Watch Online:
Where to buy
Blender Market(Last updated on July 11, 2022): new
Blender Market Store - Better FBX Importer & Exporter - Blender Add-on v5.1.0 ($28)
How To Install
Launch Blender, navigate to 'Edit->User Preference...->Add-ons', click the 'Install Add-on from file...' button, a pop up dialog will appear, select 'better_fbx-5.3.5.zip', click the 'Install Add-on from file...' button on the pop up dialog, the add-on will be installed to Blender's addons directory.

When the pop up dialog closed, we are still on Addons page, a few seconds later, the add-on will appear, activate the add-on, then click the 'Save User Settings' button and close the 'Blender User Preference' window.
Note: Please don't simply copy and paste the unzipped add-on directory to Blender's own working add-on directory, because the operating system may prevent the add-on from writing temporary data to the directory, which will cause the add-on don't work at all.
How To Upgrade
Download the new version of the product.
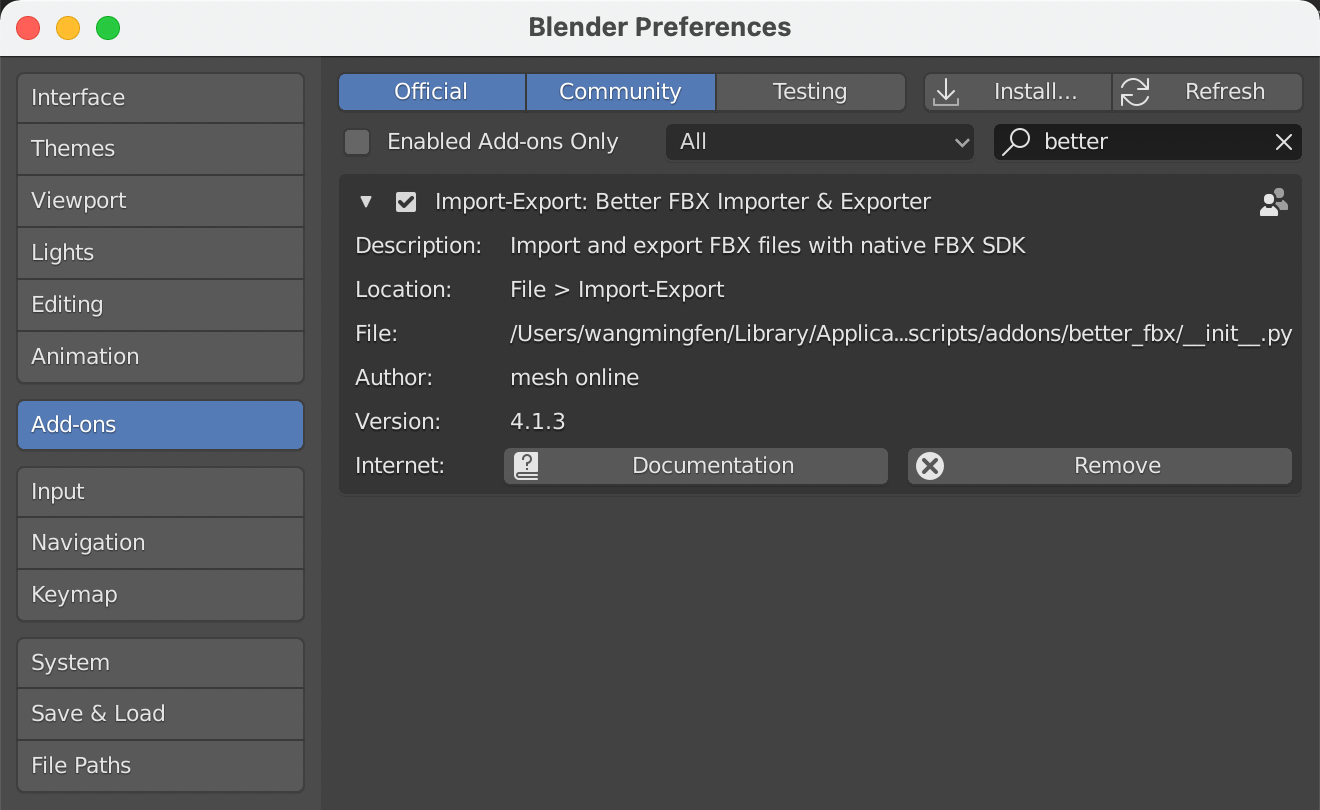
Launch Blender, navigate to File->User Preference->Addons, type 'better' in the search box, the add-on will appear, click the small triangle beside the add-on to expand the contents, click the 'Remove' button to remove the add-on.
Install the new version of the product.
Supported FBX Versions
- FBX53_MB55
- FBX60_MB60
- FBX200508_MB70
- FBX200602_MB75
- FBX200608
- FBX200611
- FBX200900
- FBX200900v7
- FBX201000
- FBX201100
- FBX201200
- FBX201300
- FBX201400
- FBX201600
- FBX201800
- FBX201900
- FBX202000
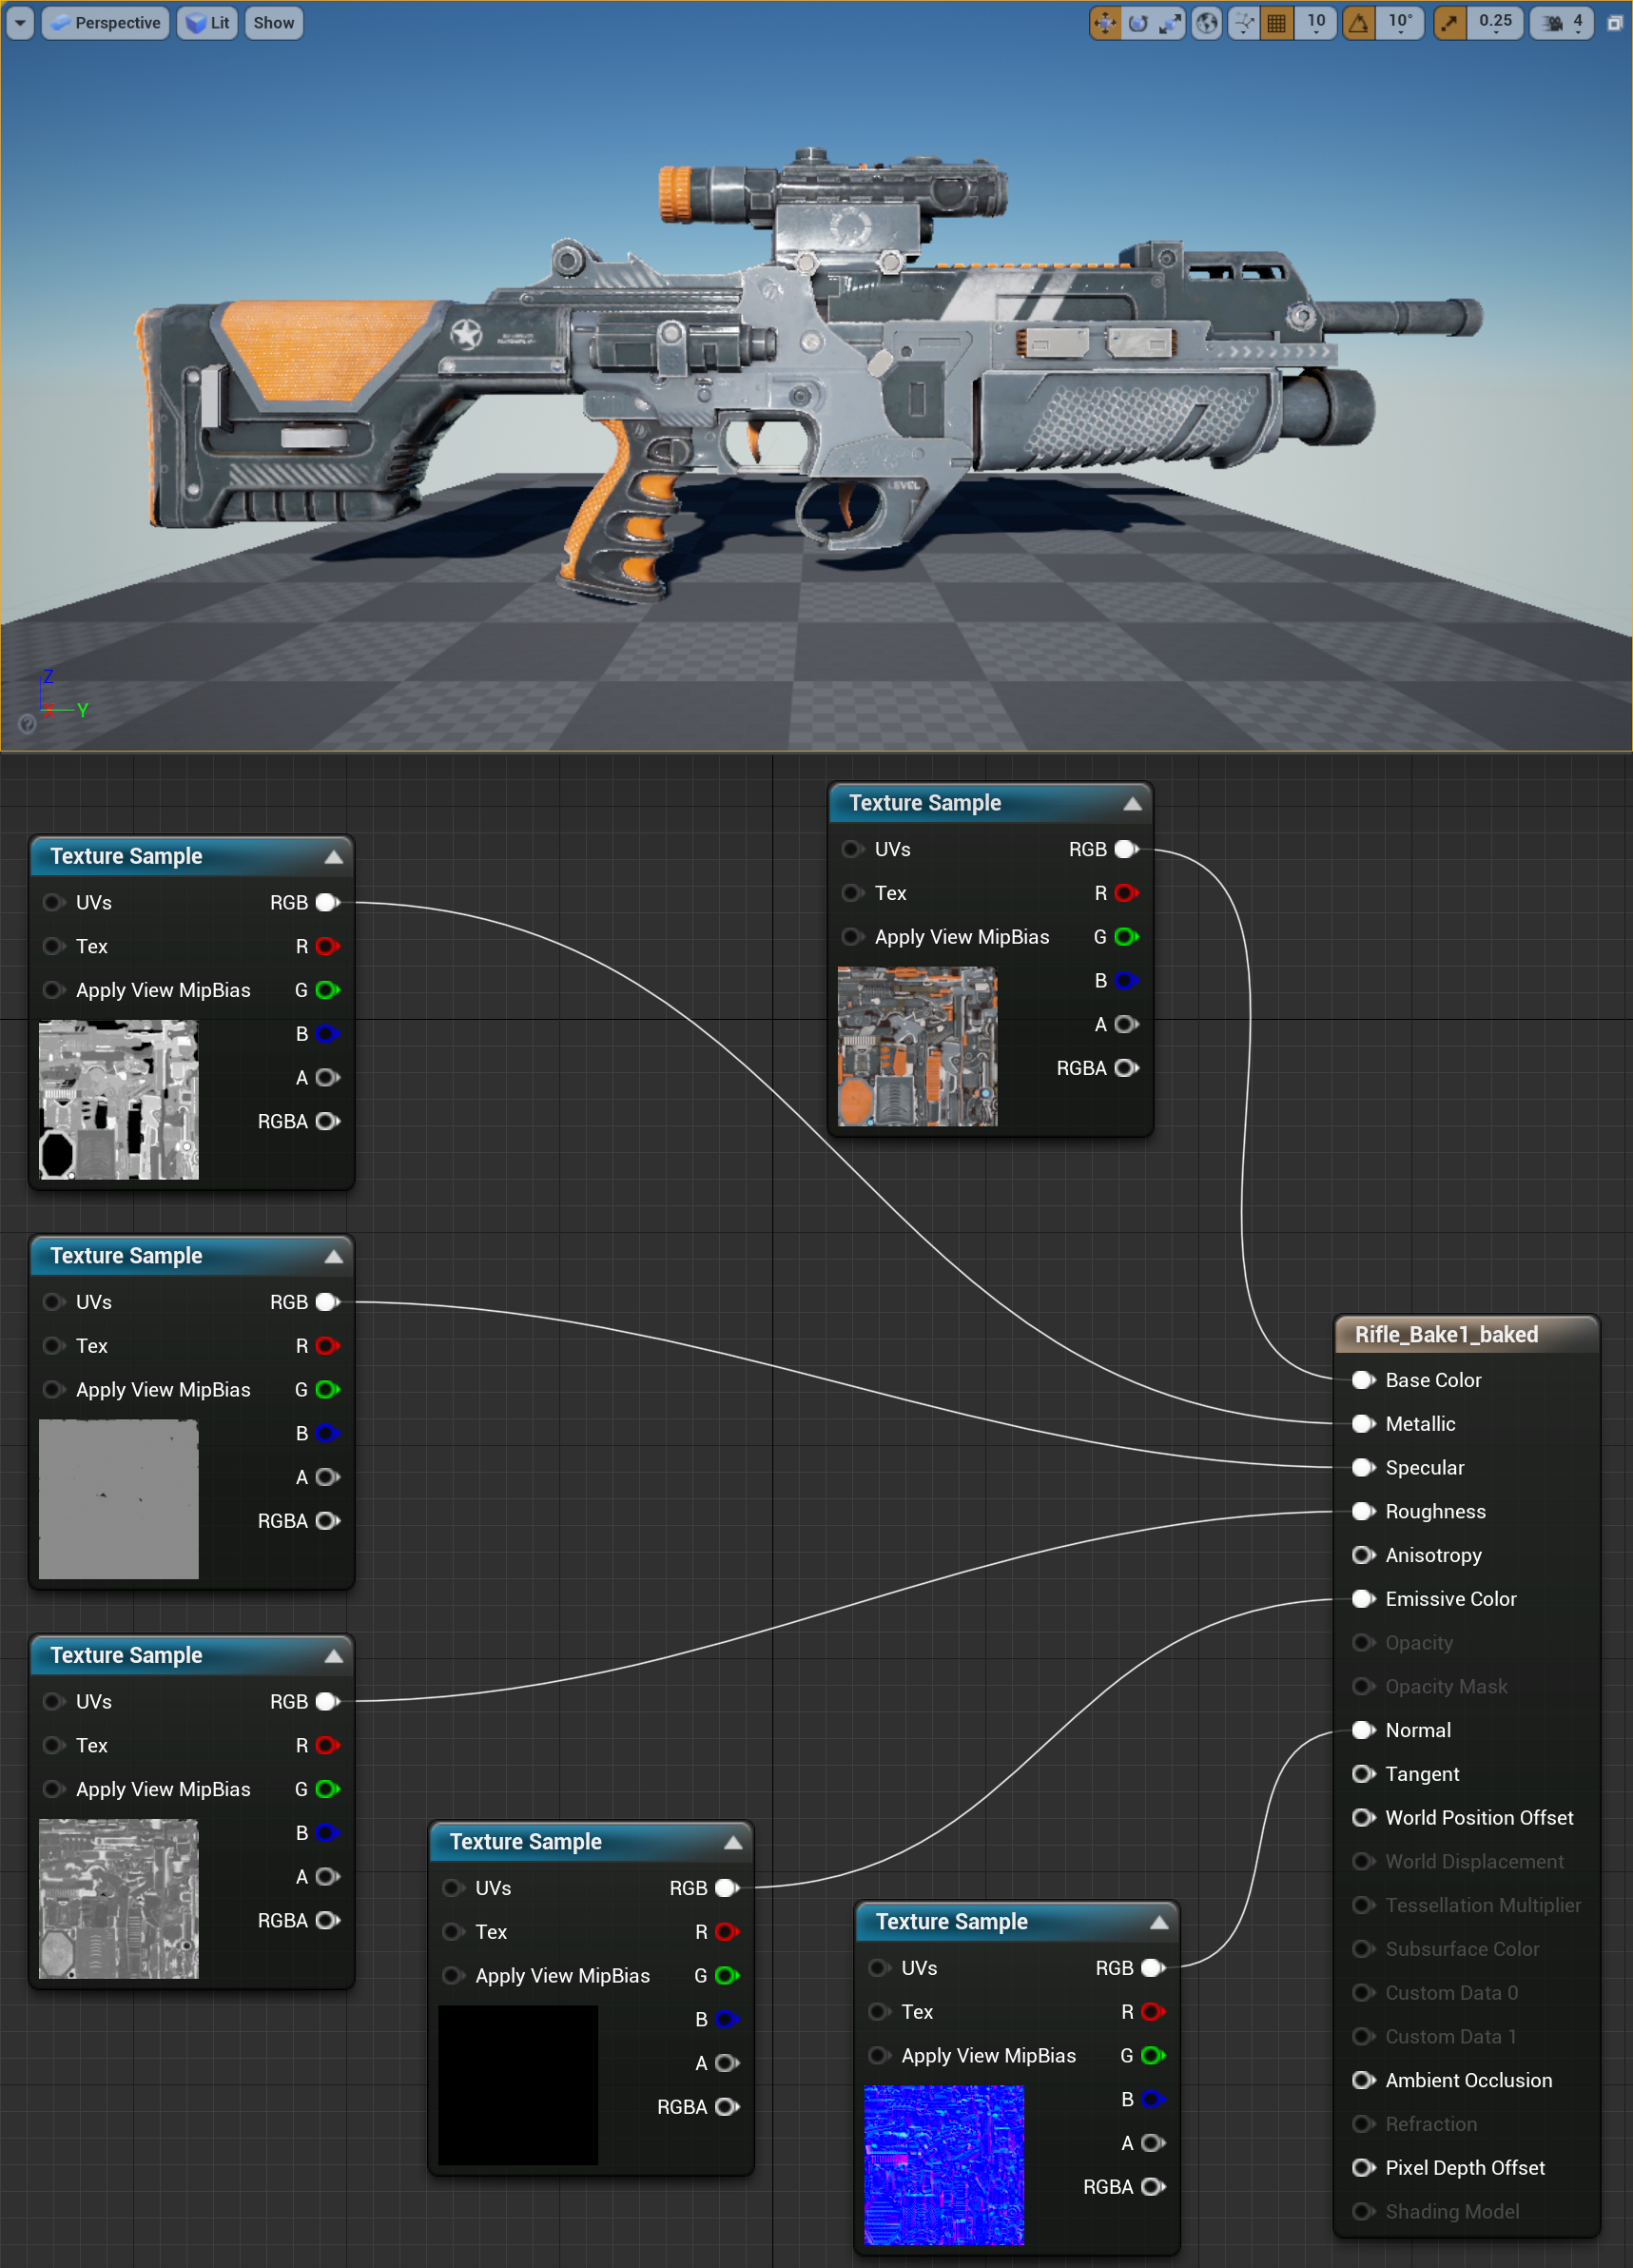
Cycles/Eevee Material
The add-on can import PBR materials from 3ds Max and Maya, including '3ds Max Physical Material', '3ds Max PBR (Metal/Rough) simplified PBR material', '3ds Max Arnold Standard Surface Material', 'Maya Arnold Standard Surface Material', and 'Maya StingRay PBS Material'.
The add-on can export PBR materials to 'FBX Standard Material', 'Unity Engine Compatible Material', and 'Unreal Engine Compatible Material'.
The add-on supports ten kinds of textures, including diffuse texture, reflection texture, specular texture, shininess texture, emissive texture, transparency texture, normal texture, bump texture, displacement texture, and ambient texture.
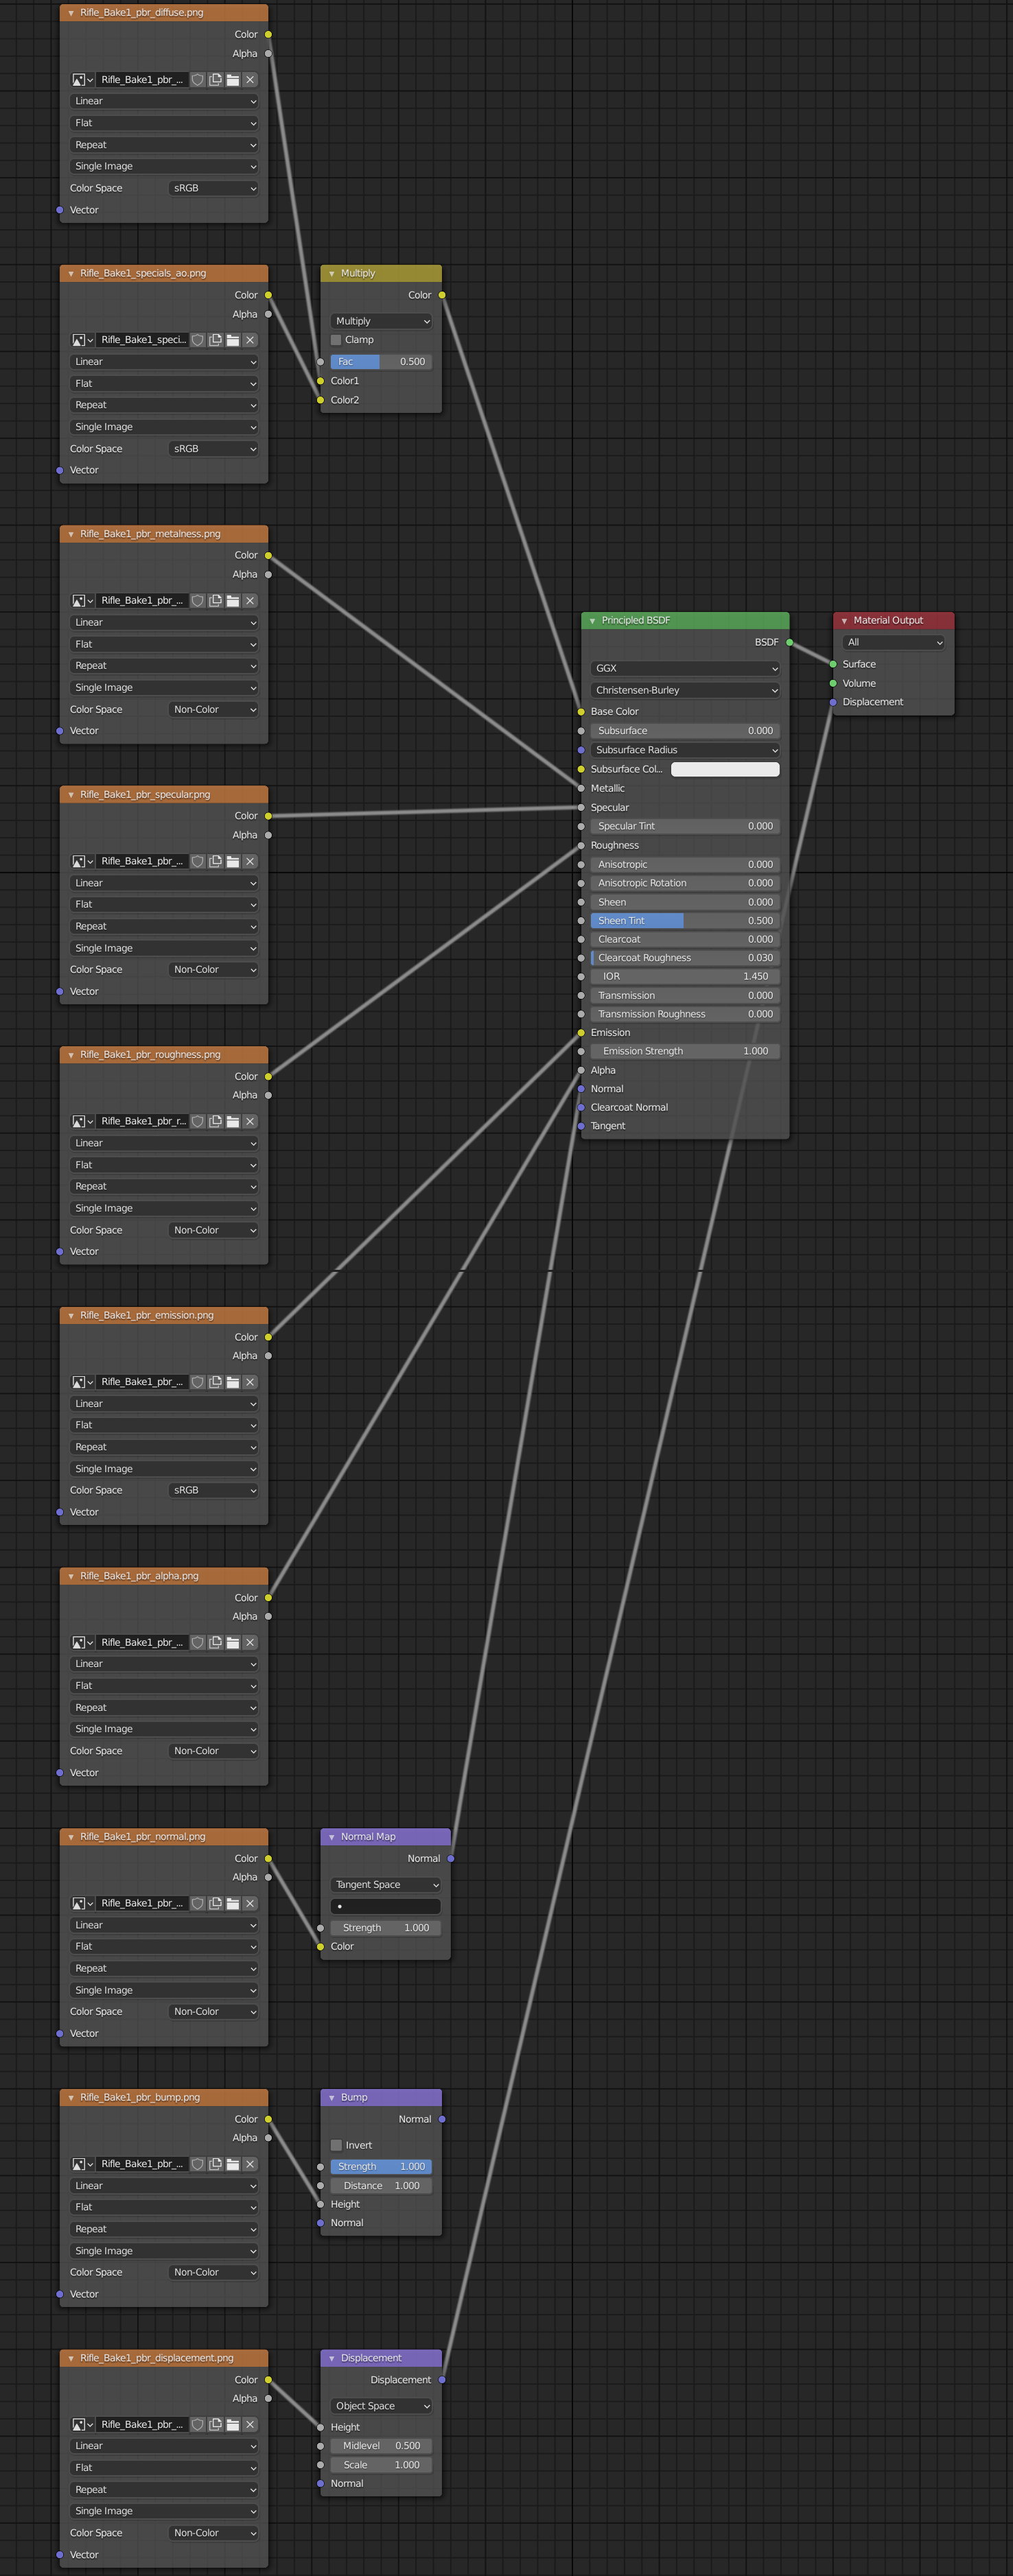
If you organize the texture image nodes according to the above picture, the add-on can export the texture images correctly.
Here are the details:
The first texture image is a diffuse texture, it can connect to the 'Basic Color' socket of the 'BSDF' node directly.
The second texture image is an ambient occlusion texture, you need to add an additional 'MixRGB' node to multiply the diffuse texture and the ambient occlusion texture, then connect the output of the 'MixRGB' node to the 'Basic Color' socket of the 'BSDF' node.
The third texture image is a metallic texture, it can connect to the 'Metallic' socket of the 'BSDF' node directly.
The fourth texture image is a specular texture, it can connect to the 'Specular' socket of the 'BSDF' node directly.
The fifth texture image is a roughness texture, it can connect to the 'Roughness' socket of the 'BSDF' node directly.
The sixth texture image is an emission texture, it can connect to the 'Emission' socket of the 'BSDF' node directly.
The seventh texture image is an alpha texture, it can connect to the 'Alpha' socket of the 'BSDF' node directly.
The eighth texture image is a normal texture, you need to add an additional 'Normal Map' node to configure the normal texture, then connect the output of the 'Normal Map' node to the 'Normal' socket of the 'BSDF' node.
The ninth texture image is a bump texture, you need to add an additional 'Bump' node to configure the bump texture, then connect the output of the 'bump' node to the 'Normal' socket of the 'BSDF' node.
The tenth texture image is a displacement texture, it can connect to the 'Displacement' socket of the 'Material Output' node directly, or you can also add an additional 'Displacement' node to configure the displacement texture, then connect the output of the 'Displacement' node to the 'Displacement' socket of the 'Material Output' node.
Material Style
There is a 'Material Style' option in the exporter since v4.4.2.
The default value is 'Blender', which means that the exported materials are compatible with Blender's material system and most other standard material systems.
You can export PBR materials for Unity Engine & Unreal Engine by changing material style.
Here is the material in Unity editor:
Make sure that the 'Material Creation Mode' is 'Import via MaterialDescription', If you have embedded textures into the FBX file, please click the 'Extract Textures...' button to extract all embedded textures; Otherwise, please click the 'Extract Materials...' button to extract the material.
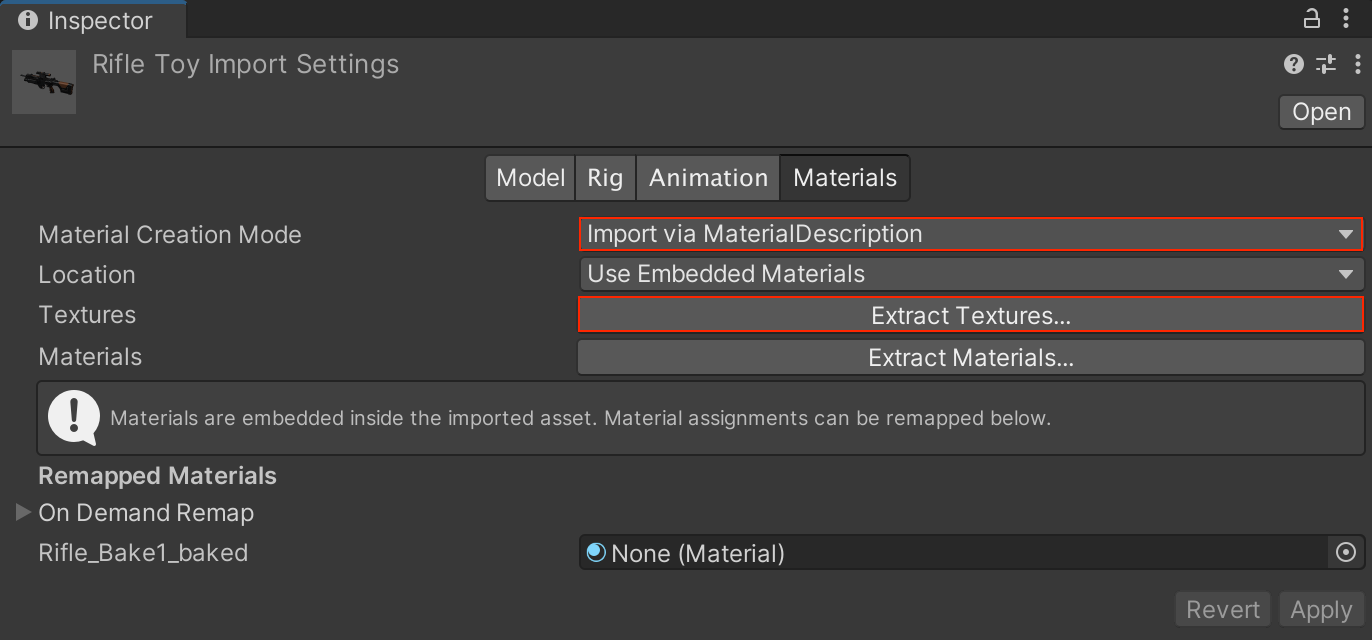
If you drag the FBX asset to the scene, an instance will be created, the 'Autodesk Interactive' shader is used, all the four channels will appear in the inspector panel automatically; If you want to use other shaders, you may need to assign some texture channels manually.
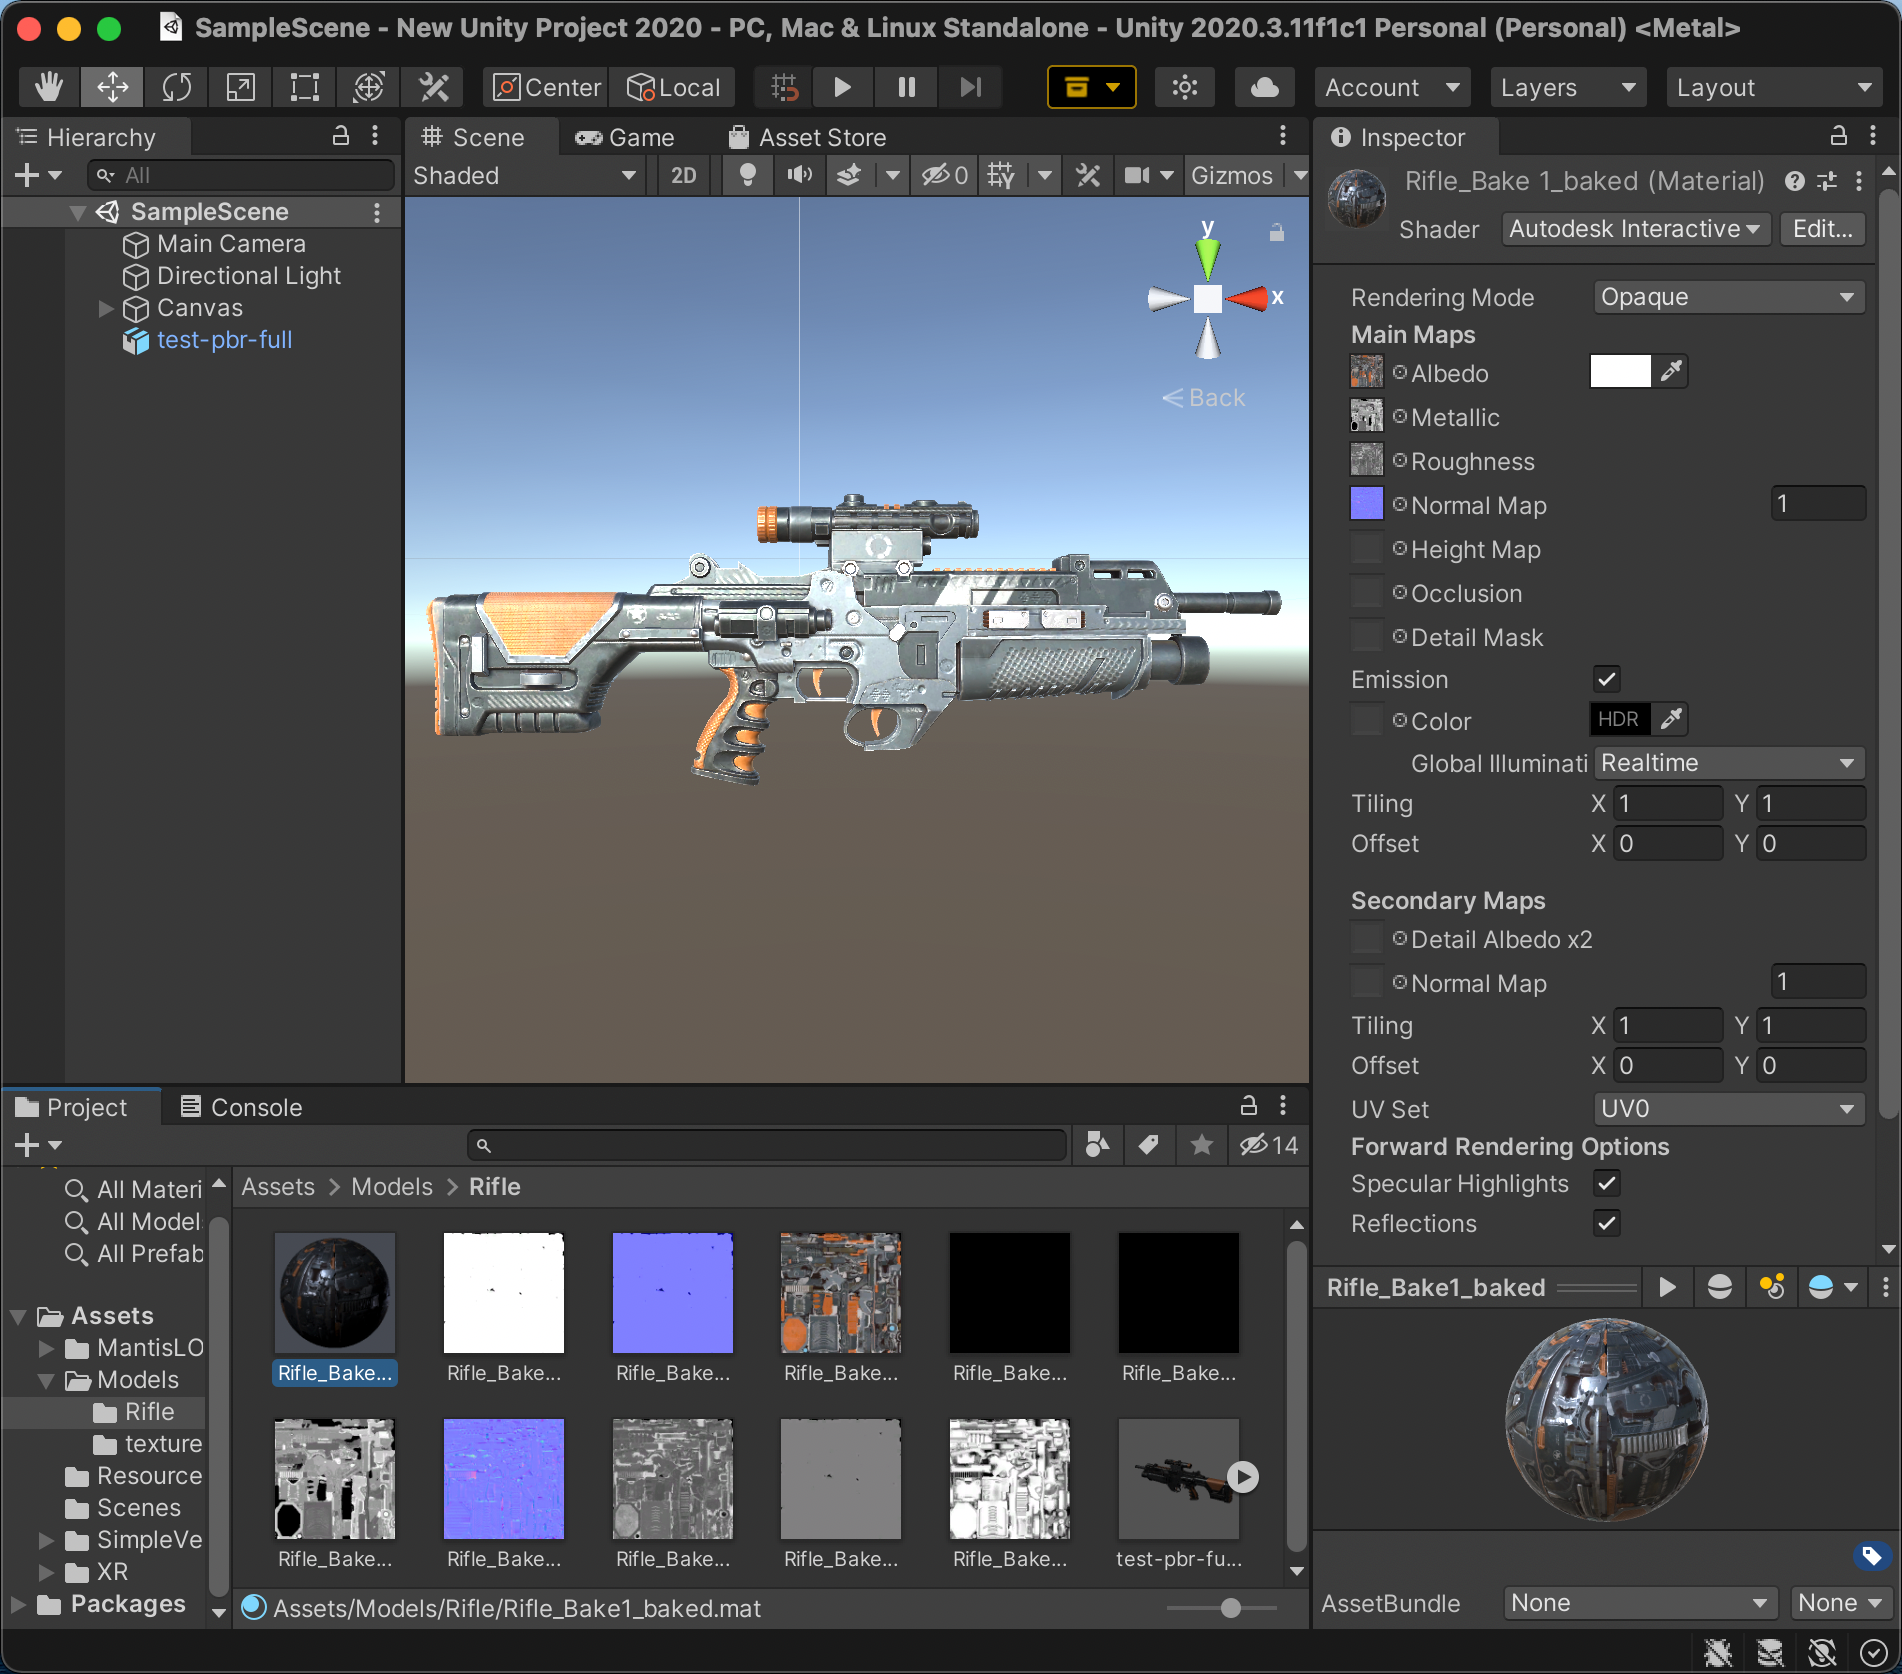
If you change the option to 'Unity Engine', the add-on will export Unity Engine compatible materials, when you import the FBX file into the Unity editor, you'll find that all the texture channels have been setup correctly.
Unity Engine's importer will not import the ambient occlusion texture automatically, you need to import and assign the ambient occlusion texture manually.
Here is the material in Unreal editor:
If you change the option to 'Unreal Engine', the add-on will export Unreal Engine compatible materials, when you import the FBX file into the Unreal editor, you'll find that all the texture channels have been setup correctly.
Unreal Engine's importer will not import the ambient occlusion texture automatically, you need to import and assign the ambient occlusion texture manually.
Embed Media
The add-on supports exporting embedded texture images into FBX file since v4.3.0.
If you want to embed all texture images into the FBX file, enable 'Embed Media' when exporting, all texture images in the shader editors will be embedded into the FBX file.
If you want to export PBR materials, you can bake the PBR materials into texture images first, search 'bake' in the Blender Market, you can find some excellent baking tools, such as 'Bake Wrangler', 'Simplebake', 'Baketool', 'PBR Texture Bakery', etc. You can choose your favorite baking tool to bake, my favorite baking tool is https://github.com/meshonline/EasyPBRBake, it is not as powerful as commercial products, but the function is enough for me. Then add the baked texture images into shader editor.
When exporting, just enable 'Embed Media', all texture images in the shader editors will be embedded into the FBX file.
Though all texture images are embedded into the FBX file, only several kind of textures can be recognized when importing into other 3d softwares and game engines, you need to load and setup them manually in their own material systems.
Generic Rigging System
This add-on can export from any generic rigging system.
The exported armature is generic, is not retarget-able, because the bones hierarchy has not been configured for game engines, but the animations work properly in any game engines.
I have verified Rigify Auto-Rigging System and Auto-Rig Pro.
If you are Auto-Rig Pro user, please use its own FBX exporter, for its exported armature is retarget-able, while from this add-on is not.
The exported FBX files can be imported to Unity Engine 2019 and Unreal Engine 4/5, and the animations work properly.
When you have finished your character, just export with this add-on, no extra setup needed.
Rigify Auto-Rigging System
This add-on supports exporting game-friendly armature from Rigify Auto-Rigging System, including retarget-able humanoid armature, quadrupled armature, or any user-defined armatures.
I recommend the paid tutorials of Rig Anything With Rigify, which will teach you everything about Rigify Auto-Rigging System.
Retarget-able human armature means that Unity Engine 2019 and Unreal Engine 4/5 can recognize the human armature and map the bones hierarchy to game engine's inner bones hierarchy, you can retarget tons of animations to your armature in game engine.
When you have finished your character, just export it with this add-on.
Select the Rigify-Rig and the skinned character, from the export interface, enable the 'Selected Objects' option and the 'Rigify Armature' option, the add-on will export game-friendly character from Rigify Auto-Rigging System.
There is also an 'Only Selected Deform Bones' option, if you enable the option, the add-on will export only selected deform bones in 'EDIT' mode.
Generic Rigify Workflow
Video Package: Download the HD version of the video(Format:zip,Size:23MB,Date:Mar 18,2022). new
Watch Online:
Here is a Character with Rigify Auto-Rigging System in Blender 2.79b, it does not contain any armature deform animations.
Here is the same character in Unity Engine 2018, Unity Engine recognized all bones.
Here is the same character in Unreal Engine 4, Unreal Engine recognized most bones, a few bones have been mapped to wrong bones, but it's not difficult to fix the mistake.
For your convenience, here is the right mapping.
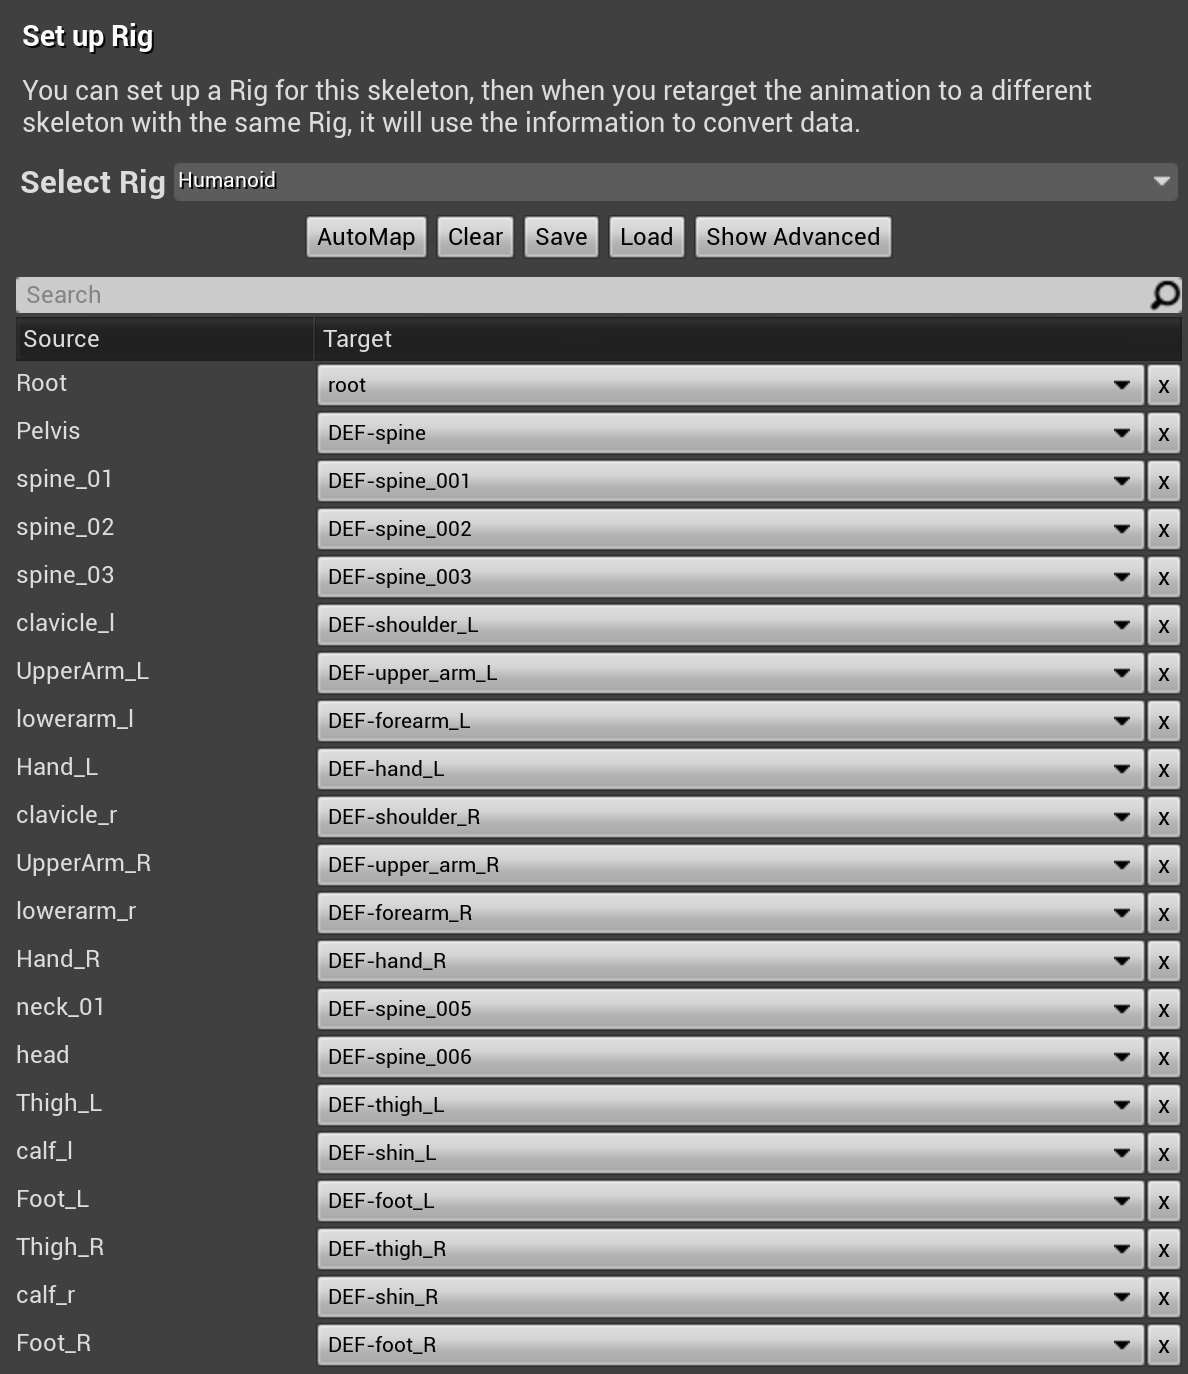
This is the complete Bone Mapping Preset, you can download and load the preset in the retarget manager to avoid fixing bone mapping manually.
Here is a zebra with Rigify Auto-Rigging System in Blender 3.1.0, I turned off IK and retargeted a walk cycle animation take to FK bones.
Here is the same zebra in Unity Engine 2020, I had exported the 3d model with v5.0.1.
Here is the same zebra in Unreal Engine 4, I had exported the 3d model with v5.0.1.
Here is the same zebra in Godot Engine 3.4, I had exported the 3d model as DAE with v5.0.1.
I have also tested some other 3d models, including all the weird creatures in Rig Anything With Rigify, all the exported 3d models can work very well in Unity Engine, Unreal Engine, and Godot Engine.
Optimize For Blender
The add-on can import Blender friendly armature and 3d models, the imported armature and 3d models have unit scale and zero rotations.
This is an experimental feature, which may has bugs, use at your own risk.
Optimize For Game Engine
The add-on can export game engine friendly armature and 3d models, the exported armature and 3d models have unit scale and zero rotations.
This feature is very useful for game development, for animation retargeting usually requires that the armature has unit scale and zero rotations, and it is easy to manipulate 3d models via code if they have unit scale and zero rotations.
You can use Blender's default setting to work, use meter as the unit of the scene, and use 1.0 as the scale of the scene.
When exporting, make sure you have enabled the 'Optimize For Game Engine' option, the option is enabled by default.
Just export the contents, the exporter will convert meter to centimeter automatically, and apply all rotations to zero automatically.
I have verified exported files in Unity Engine 2019.3.3f1, Unreal Engine v4.22.3, Godot Engine v3.2, all the armatures and 3d models have unit scale and zero rotations.
UDIM Mapping
Version 4.2.2 supports UDIM Mapping.
You can import UDIM mapping into Blender 2.82 or newer versions.
You can export UDIM mapping from Blender 2.82 or newer versions.
Zbrush Workflow
The add-on supports importing and exporting edge crease weights, you can transfer 3d models with edge crease weights lossless between Blender and Zbrush.
For example:
In blender side, you can setup a special pose for the armature deformed character to prepare to sculpt some details in Zbrush, you can click and select the charcter only, export the charcter with the add-on, from within the exporter panel, enable the 'Selected Objects' option, enable the 'Apply Modifiers' option, and enable the 'Include Armature Deform Modifier' option, then export the character to FBX file.
In Zbrush side, import the exported character, add some sculpture details, then export the detailed charcter to an ASCII format of FBX file, since Zbrush's FBX plugin has a bug for binary format of FBX, the add-on only supports ASCII format of FBX files exported from Zbrush with edge crease weights lossless until Zbrush fixed the bug.
Back to blender side, import the detailed charcter with the add-on, bind it back to its armature.
Special thanks to Tsukasa YAMATO, the famous Zbrush plugin creator from Japan, without his help, the Zbrush workflow will not be born.
Import Multiple Files
Version 4.0 supports importing multiple files, you can simply select multiple files when importing, the importer will import them all into the current collection of the scene.
Export to Separate Files
Version 4.2.1 supports exporting to separate files by object name, if you want to export each item to a separate file, you can enable the 'Separate Files' option when exporting.
Export To Single File
I recommend that you design animations in 'NLA Editor', in this way, you store animations into virtual tracks, while don't touch the original keyframe actions.
By default, the add-on only exports the active animation, if you want to export separate animations, you need to change active animations one by one, every time you export an animation.
If you want to export the active animation in 'Action Editor' instead of the active animation in 'NLA Editor', you must delete all tracks in 'NLA Editor', for 'NLA Editor' has higher priority than 'Action Editor'.
You usually don't need to bake animation before exporting, just export when you are ready.
If you find that the exported animation is not as the same as it in Blender, try baking animation before exporting, for baking animation can always fix various issues.
Export Multiple Actions
I recommend that you design animations in 'NLA Editor', in this way, you store animations into virtual tracks, while don't touch the original keyframe actions.
Version 4.5.1 supports exporting multiple animations into a single file, if you have one character with multiple animations, you can export all animations by changing the 'Animation Type' option to 'All Actions' or 'All NLA Tracks' when exporting. 'All Actions' means exporting from 'Action Editor', while 'All Tracks' means exporting from 'NLA Editor'.
If you want to get a concatenated action, you need to enable the 'Concatenate All' option as well, the exporter will concatenate all actions or all NLA tracks into a single action automatically, then export the single action into FBX file.
But exporting multiple animation actions has a few limitations:
Detail Of The Parameters
The parameters in the importer:
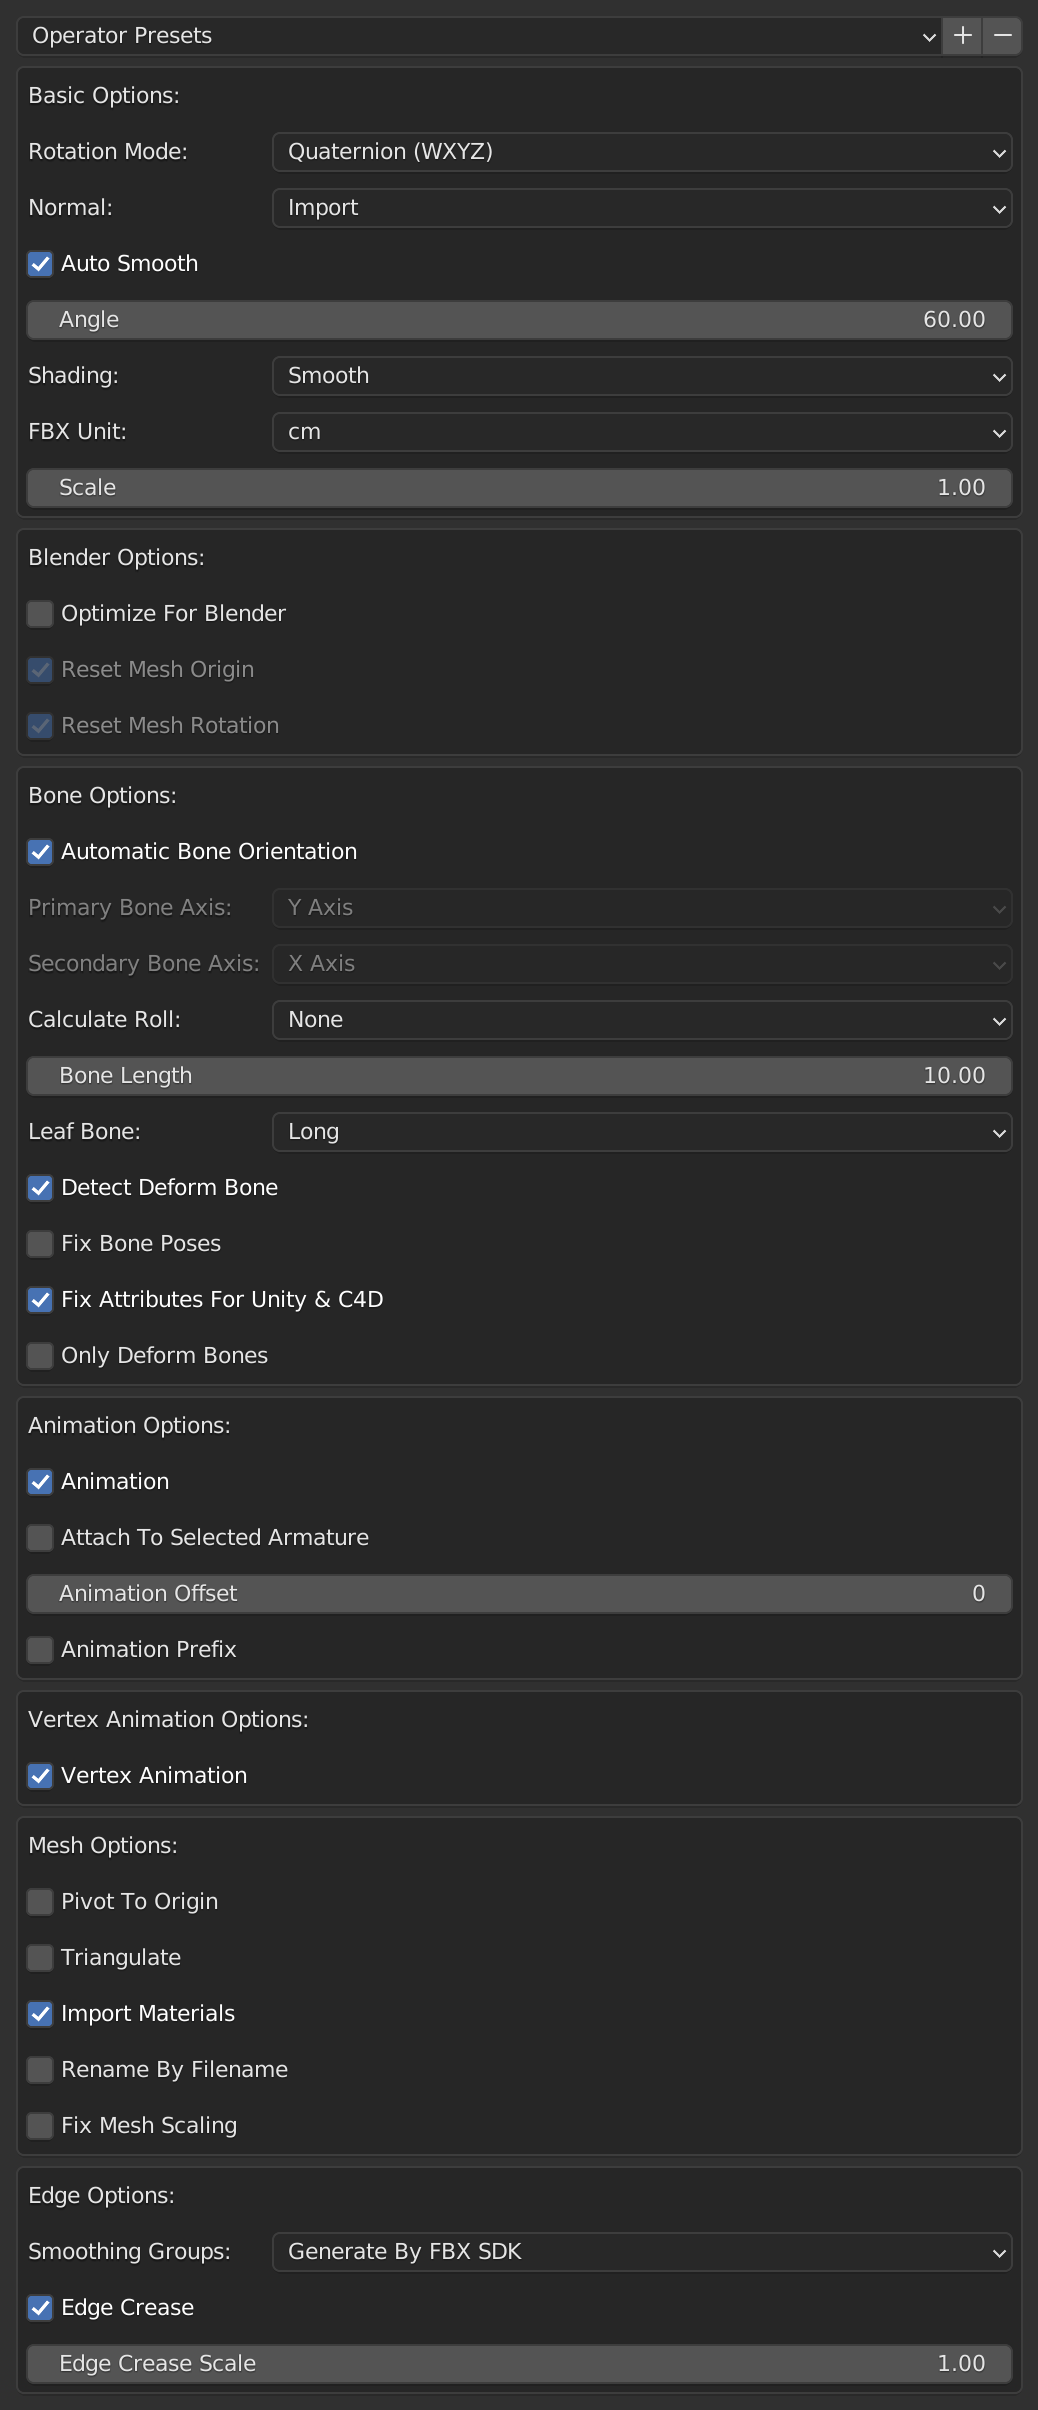
Rotation Mode
You can chooce your favorite rotation mode.
The default parameter is 'Quaternion (WXYZ)'.
Normal
'Calculate' means that we don't use imported normals, we let Blender generate normals for us.
'Import' means that we use imported normals.
The default parameter is 'Import'.
Auto Smooth
Auto smooth (based on smooth/sharp faces/edges and angle between faces).
The default parameter is enabled.
Angle
Maximum angle between face normals that will be considered as smooth.
The default parameter is 60.0 degrees.
Shading
How to render and display faces.
'Smooth' means that render and display faces smooth, using interpolated vertex normals.
'Flat' means that render and display faces uniform, using face normals.
The default parameter is 'Smooth'.
Scale
If the imported 3d model looks too small or too large, you may change the value to let it have proper size.
The default parameter is 0.01.
Optimize For Blender
When enabled, make Blender friendly rotation and scale.
When disabled, keep original rotation and scale.
The default parameter is disabled.
Automatic Bone Orientation
Automatically sort bones orientations, if you want to preserve the original armature, please disable the option.
The default parameter is enabled.
Calculate Roll
Automatically fix alignment of imported bones’ axes when 'Automatic Bone Orientation' is enabled.
The default parameter is 'None'.
Bone Length
Bone length when 'Automatic Bone Orientation' is disabled.
The default parameter is 10.0.
Leaf Bone
There are two leaf bone styles - 'Long' and 'Short'.
'Long' means that the length of a leaf bone is equal to 1/1 of the length of its parent bone.
'Short' means that the length of a leaf bone is equal to 1/10 of the length of its parent bone.
The 'Long' style lets you easily select leaf bones, the 'Short' style make the armature looks more beautiful.
The default parameter is 'Long'.
Fix Bone Poses
When enabled, try fixing bone poses with default poses whenever bind poses are not equal to default poses.
When disabled, does not try fixing bone poses with default poses whenever bind poses are not equal to default poses.
The default parameter is disabled.
Fix Attributes For Unity & C4D
When enabled, try fixing null attributes for Unity's FBX exporter & C4D's FBX exporter, but it may bring extra fake bones.
When disabled, nodes without any attributes will be ignored.
The default parameter is enabled.
Only Deform Bones
When enabled, imports only deform bones.
When disabled, imports all bones, include IK bones, deform bones, and control bones.
The default parameter is disabled.
Animation
When enabled, imports the armature, the animation action and shape key action.
When disabled, only imports the armature with bind pose and blend shapes.
The default parameter is enabled.
Animation Offset
Add an offset to all keyframes.
The default parameter is 0.
Animation Prefix
When enabled, add object name as animation prefix.
When disabled, does not add object name as animation prefix.
The default parameter is disabled.
Vertex Animation
When enabled, imports vertex animation.
When disabled, does not import vertex animation.
The default parameter is enabled.
Triangulate
When enabled, converts polygon to triangle.
When disabled, does not convert polygon to triangle.
The default parameter is disabled.
Import Materials
When enabled, import materials for meshes.
When disabled, does not import materials for meshes.
The default parameter is enabled.
Rename By Filename
When enabled, rename imported meshes or armatures by their filenames, it only works when importing multiple files.
When disabled, does not rename imported meshes or armatures with their filenames, it only works when importing multiple files.
The default parameter is disabled.
Smoothing Groups
How to generate smoothing groups.
The default parameter is 'Generate By FBX SDK'.
Edge Crease
When enabled, imports edge crease weights.
When disabled, does not import edge crease weights.
The default parameter is enabled.
Edge Crease Scale
Scale of edge crease weights.
The default parameter is 1.0.
The parameters in the exporter:
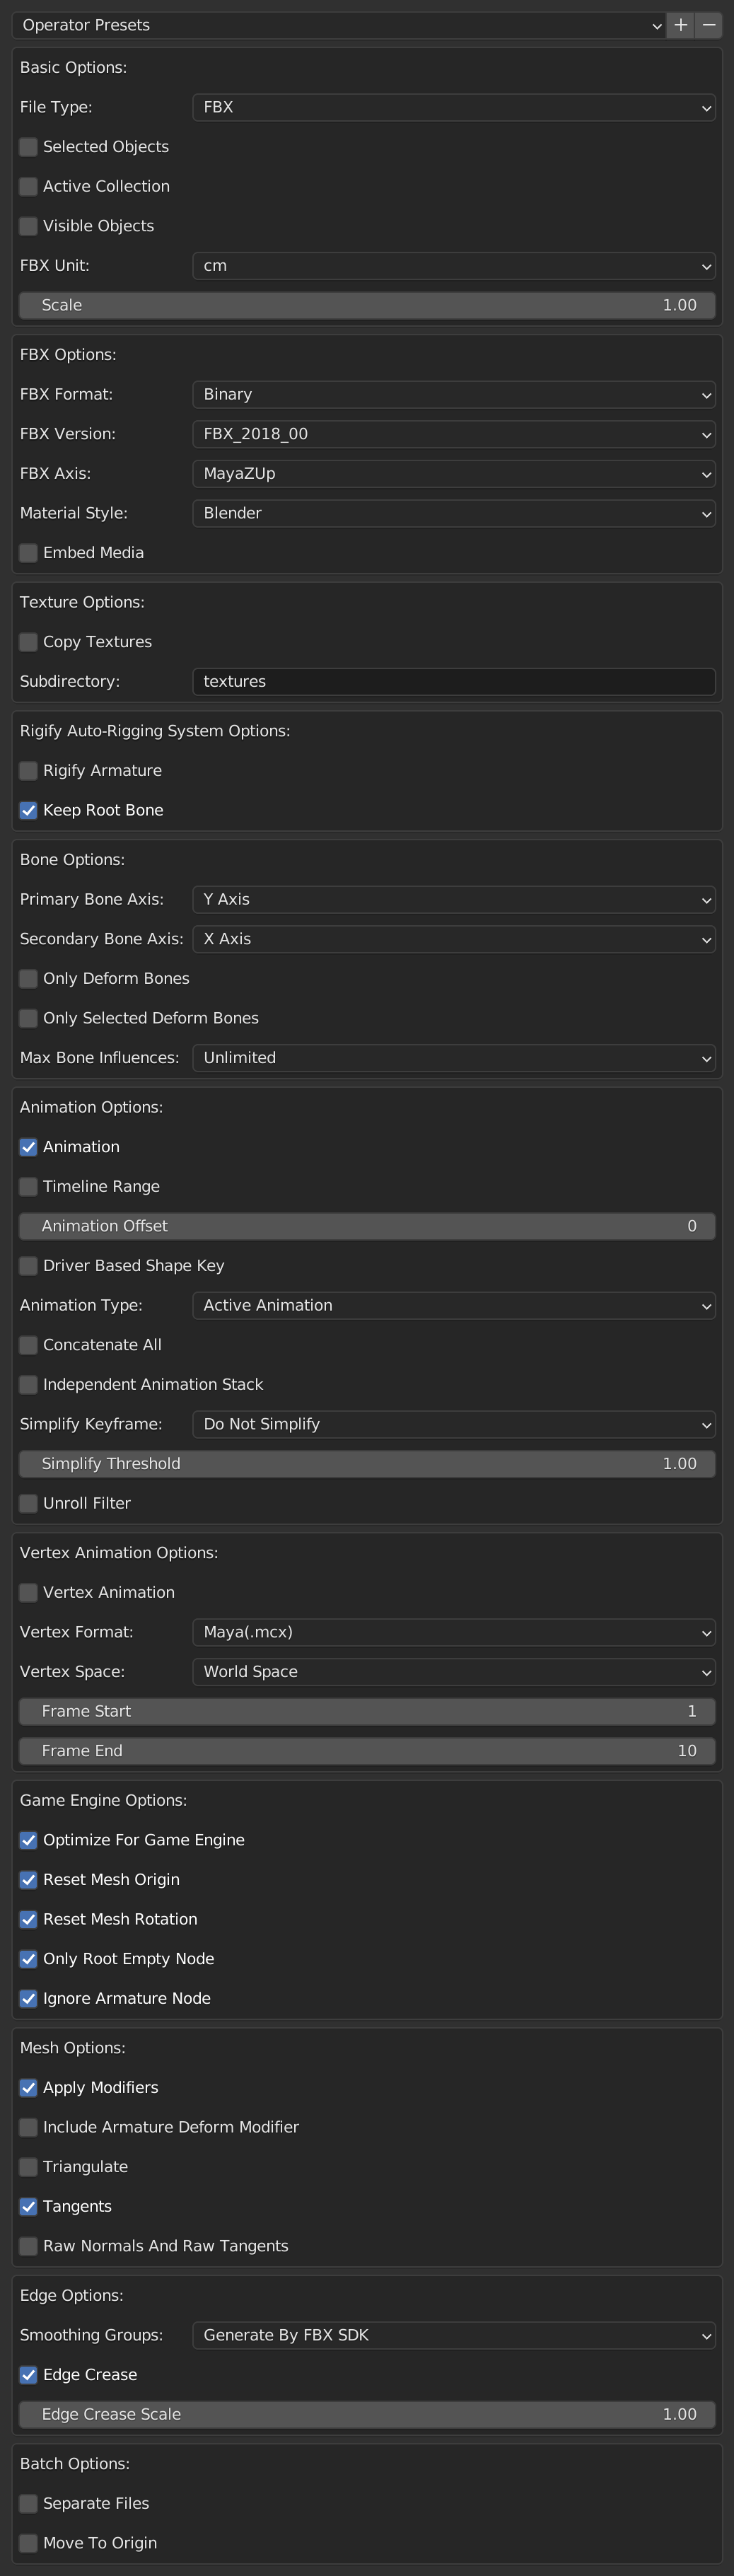
File Type
You can choose FBX, DAE, OBJ or DXF to export.
The default parameter is 'FBX'.
Selected Objects
When enabled, exports selected objects on visible layers.
When disabled, exports all objects in the scene.
The default parameter is disabled.
Scale
If the exported 3d model looks too small or too large, you may change the value to let it have proper size.
The default parameter is 100.0.
FBX Format
You can choose your favorite FBX format.
The default parameter is 'Binary'.
FBX Version
You can choose your favorite FBX version.
The default parameter is 'FBX_2018_00'.
FBX Axis
You can choose your favorite FBX Axis.
The default parameter is 'MayaZUp'.
Material Style
You can choose your favorite material style.
The default parameter is 'Blender'.
Embed Media
When enabled, embed all texture images into FBX file.
When disabled, does not embed any texture images into FBX file.
The default parameter is disabled.
Copy Textures
When enabled, if not embed media, copy texture images to user-defined subdirectory.
When disabled, does not copy texture images to user-defined subdirectory.
The default parameter is disabled.
Subdirectory
User-defined subdirectory in the same directory of the exported file.
The default parameter is "textures".
Note: If you use an empty string, the exporter will copy all the texture files into the same directory of the exported file.
Rigify Armature
When enabled, exports game-friendly armature for Rigify Auto-Rigging System.
When disabled, exports generic armature.
The default parameter is disabled.
Keep Root Bone
When enabled, keep the root bone when making game-friendly armature for Rigify Auto-Rigging System.
When disabled, does not keep the root bone when making game-friendly armature for Rigify Auto-Rigging System.
The default parameter is enabled.
Only Deform Bones
When enabled, exports only deform bones.
When disabled, exports all bones, include IK bones, deform bones, and control bones.
The default parameter is disabled.
Only Selected Deform Bones
When enabled, exports only selected deform bones in 'EDIT' mode.
When disabled, exports all deform bones.
The default parameter is disabled.
Max Bone Influences
Maximum bone influences you can have per vertex.
2: Suitable for mobile game.
3: Suitable for mobile game.
4: Suitable for mobile game.
6: Suitable for desktop game.
8: Suitable for desktop game.
Unlimited: Suitable for generic animation.
The default parameter is Unlimited.
Fix Rigify
When enabled, exports retarget-able human armature for Rigify Auto-Rigging System.
When disabled, exports generic armature.
The default parameter is disabled.
Fix Hint
Describe how to setup user defined bones.
For example:
"attach ponytail.01 to spine.006; attach tail.01 to spine"
Or
"attach def-ponytail.01 to def-spine.006; attach def-tail.01 to def-spine"
You can omit the prefix of "def-", or use the exact deform bone name.
The description is case insensitive, use semicolon to separate multiple descriptions.
Animation
When enabled, exports the armature, the animation action and shape key action.
When disabled, only exports the armature with bind pose and blend shapes.
The default parameter is enabled.
Animation Offset
Add an offset to all keyframes.
The default parameter is 0.
Driver Based Shape Key
If the blend shapes are driven by bones, you need to enable this option.
The default parameter is disabled.
Animation Type
You can choose to export active animation, all actions, or all NLA tracks.
The default parameter is 'Active Animation'.
Concatenate All
When enabled, concatenates all actions or all NLA tracks into a single action if 'Animation Type' is not 'Active Animation'.
When disabled, exports separate actions or separate NLA tracks if 'Animation Type' is not 'Active Animation'.
The default parameter is disabled.
Simplify Keyframe
When enabled, simplify keyframe values by removing similar keyframe values.
When disabled, does not simplify any keyframe values.
The default parameter is disabled.
Simplify Keyframe Factor
How much to simplify keyframe values (0.0 to disable, the higher the more simplified).
The default parameter is 1.0.
Vertex Animation
When enabled, exports vertex animation.
When disabled, does not export vertex animation.
The default parameter is disabled.
Vertex Format
You can choose 'Maya(.mcx)' or '3ds Max(.pc2)' to export.
The default parameter is 'Maya(.mcx)'.
Vertex Space
You can choose 'Local Space' or 'World Space'.
The default parameter is 'World Space'.
Frame Start
The start frame of vertex animation.
The default parameter is 1.
Frame End
The end frame of vertex animation.
The default parameter is 10.
Optimize For Game Engine
When enabled, make game engine friendly rotation and scale.
When disabled, keep original rotation and scale.
The default parameter is enabled.
Reset Mesh Origin
When enabled, reset mesh origin to zero when 'Optimize For Game Engine' is enabled.
When disabled, keep mesh origin when 'Optimize For Game Engine' is enabled.
The default parameter is enabled.
Ignore Armature Node
When enabled, does not export the armature node as a dummy node.
When disabled, exports the armature node as a dummy node.
The default parameter is enabled.
Apply Modifiers
When enabled, apply all modifiers on mesh objects except armature deform ones, but all mesh objects with shape keys will be ignored.
When disabled, does not apply all modifiers on mesh objects.
The default parameter is enabled.
Include Armature Deform Modifier
When enabled, apply armature deform modifiers on mesh objects too when the 'Apply Modifiers' option is enabled.
When disabled, does not apply armature deform modifiers on mesh objects.
The default parameter is disabled.
Triangulate
When enabled, converts polygon to triangle.
When disabled, does not convert polygon to triangle.
The default parameter is disabled.
Smoothing Groups
How to generate smoothing groups.
The default parameter is 'Generate By FBX SDK'.
Edge Crease
When enabled, exports edge crease weights.
When disabled, does not export edge crease weights.
The default parameter is enabled.
Edge Crease Scale
Scale of edge crease weights.
The default parameter is 1.0.
Separate Files
When enabled, exports to separate files by object name.
When disabled, exports to a single file.
The default parameter is disabled.
Frequently Asked Questions
Q: What is the difference between the Seats?
A: They are different licenses for different teams. For example, if a small team which has up to 20 artists who need to install the add-on, the team should purchase one license for 20 seats, it is much cheaper than purchasing 20 indie licenses, and the team can't purchase only one indie license and distribute the add-on to all their artists, for it is illegal in law.
Q: Why does imported Daz FBX have only T pose?
A: Daz Studio will export the default pose instead of armature animation if you don't set pose on the timeline.
Please set at least two poses on the timeline, Daz Studio will export armature animation instead of the default pose.
The add-on does not support importing poses.
Q: Does it support automatic bone orientation?
A: Yes, maybe it is the greatest feature of this add-on!
Because many other 3d softwares use different joint systems from Blender, when you import these FBX files to Blender, the bones orientations often look very ugly, it is really a nightmare.
This is the reason why I made this add-on, I can't bear it any more.
This add-on always automatically corrects the bones orientations, while remain the armature deform animations not changed.
The work is so reliable that I make it a default feature.
Q: How many renderers does it support?
A: The add-on supports traditional Blender Renderer, mature Cycles Renderer and latest Eevee Renderer.
Please read the contents in the 'Cycles/Eevee Material' section to learn more details.
Q: Should I bake animations before exporting to FBX files?
A: No, just export when you have finished your job.
Q: Should I apply modifiers for the mesh before exporting to FBX file?
A: Yes, if the mesh has a 'Subdivision Surface' modifier and other modifiers, you need to apply the modifiers manually before exporting to FBX file, otherwise, the add-on will export the raw mesh, not the final mesh.
Q: Can I export only parts of deform bones?
A: The add-on supports exporting parts of deform bones for Rigify Auto-Rigging System.
Select the 'rig', reveal the deform bones layer, enter 'EDIT' mode, select all the deform bones you want to export, quit 'EDIT' mode, export the rigged character and the armature, when exporting, set 'Fix Rig' option to 'Rigify Auto-Rigging System', enable 'Only Selected Deform Bones' option.
This feature is very useful for game engines, for Rigify armature has up to 160 deform bones, usually we don't need all of them in game engines.
You can select necessary deform bones in 'EDIT' mode, then export, the unused vertex weights will be merged to the used deform bones automatically, so you don't need to re-skin your character.
The add-on will support more rigging systems in future.
Q: Can the add-on export Auto-Rig Pro armature and animation?
A: Though the add-on can export Auto-Rig Pro armature and animation, the exported armature is not retarget-able.
I recommend that all Auto-Rig Pro users export FBX from its own exporter, the exported armature is very neat and retarget-able for Unity and Unreal Engines.
License
The license of this add-on is "GPL".
The add-on does not interact with FBX SDK, instead, it interacts with a universal text format I invented, which is elegant and plug-in friendly, supports all 3d softwares.
The product package also includes an external command-line utility, which interacts with the universal format, and convert it to FBX format, or vise versa.
The external command-line utility is written in c++, which links to FBX SDK to generate the binary file.
The add-on uses the external command-line utility via a simple system call.
Note: The external command-line utility is NOT under GPL license.
The external command-line utility respects Autodesk FBX SDK license, which requires the developer to put the following statement in the online document.
"This software contains Autodesk® FBX® code developed by Autodesk, Inc. Copyright 2014 Autodesk, Inc. All rights, reserved. Such code is provided “as is” and Autodesk, Inc. disclaims any and all warranties, whether express or implied, including without limitation the implied warranties of merchantability, fitness for a particular purpose or non-infringement of third party rights. In no event shall Autodesk, Inc. be liable for any direct, indirect, incidental, special, exemplary, or consequential damages (including, but not limited to, procurement of substitute goods or services; loss of use, data, or profits; or business interruption) however caused and on any theory of liability, whether in contract, strict liability, or tort (including negligence or otherwise) arising in any way out of such code."